Showing posts with label refashion. Show all posts

Sunday

Winter Solstice

As the shortest day of the year turns into the longest night, I dress in neutral grays to match my surroundings, but with pops of color; stripes and stars hat, green gloves, blue cons. I've got some ideas of where I want my blog to go in the new year. I'll share those thoughts with you soon, but for now I hope you are enjoying this holiday season with friends and family.
Outfit Details:: Hat (Old Navy), Coat (Thrifted/DIY), Jeans (F21), Sneakers (Converse)


Tuesday

Before & After// Lace Trim Sweater DIY

 The other day my friend Leanne was wearing a really cute crochet trimmed sweater from Urban Outfitters. I loved the look and figured I could make something similar. I used a sweater I had thrifted a while ago that I didn't mind updating. The sweater I used was already long enough to wear with leggings, but the lace adds a nice touch and brings the sweater to an overall more comfortable length. I thrifted a lace tablecloth a while back and still had some leftover so I used that for my trim.

I cut two identical rectangles from the lace, doubling over the fabric. So I ended up cutting two 24cm pieces in length and folding them in half to create two 12cm rectangles. The width will obviously vary based on the sweater that is used. I hemmed all of the raw edges to prevent fraying. Then, I turned my sweater inside out and sewed a lace panel to the front and back sides. Easy. This is a really simple and quick DIY and I like the versatility of the lace. This technique would look good on any sweater with a loose fitting hemline.


Thursday

Fabric Medium & Acrylic Paint

 I've been looking into block printing a lot lately after being wildly inspired by Block Shop Textiles. Seriously, check them out. I started researching different printing techniques and materials and discovered a new product! Well, new to me anyway. Textile medium, how could I not know of your existence?! With fabric painting being one of my all time favorite things to do, textile medium is a total game changer. For those of you who were also in the dark on fabric medium, it allows you to turn regular acrylic paint into fabric paint. Which means pretty much limitless color options for way less money, kids. I'm all about it.
 While traditional block printing uses some kind of natural ink or dye and intricately carved wooden blocks, for the less experienced and budget minded folks (like me), the same effect can be achieved with simple homemade stamps and some fabric paint.
 Making The Stamp: I knew I wanted to do a simple triangle pattern. I used a thin sheet of craft foam and cut out 2 identical triangles. I taped the triangles together, just for some added thickness, and then taped the triangle to a wooden block for stability. Obviously, this technique can be adapted for any kind of shape your crafty heart desires.
 The Printing Process: I put a book in between the layers of my shirt to create a hard, smooth service and to prevent the paint from bleeding through to the other side. I decided to do a color gradient of yellow to green. In a cup, I combined 2 parts dark green acrylic paint to 1 part fabric medium and mixed with a paintbrush. I applied a thin, even coat of paint to my stamp and pushed down on both sides of the block to get an even color distribution. I reapplied a coat of paint prior to each stamping. As you can see from the above picture, it's not a perfect process, but I actually like how the stamps are slightly imperfect. It adds character.
 Because I was working on a color gradient, I was able to just continuously mix my color in the same cup by adding paint and fabric medium as I went.
 After the paint dries completely, it must be heat set. I layered a scrap piece of fabric over my design and used a dry iron (no steam!) to go over the painted area for 20 seconds. The textile medium I used suggests waiting to wash the painted material for 7 days after printing, but follow the directions of whatever you use.
 I love how this turned out! I started with something simple because I've never used textile medium before, but it's very easy to use. I have visions of hand printing a scarf or quilt next. Have you ever tried block printing? What materials did you use?

Friday

Before & After // London Fog Trench Coat

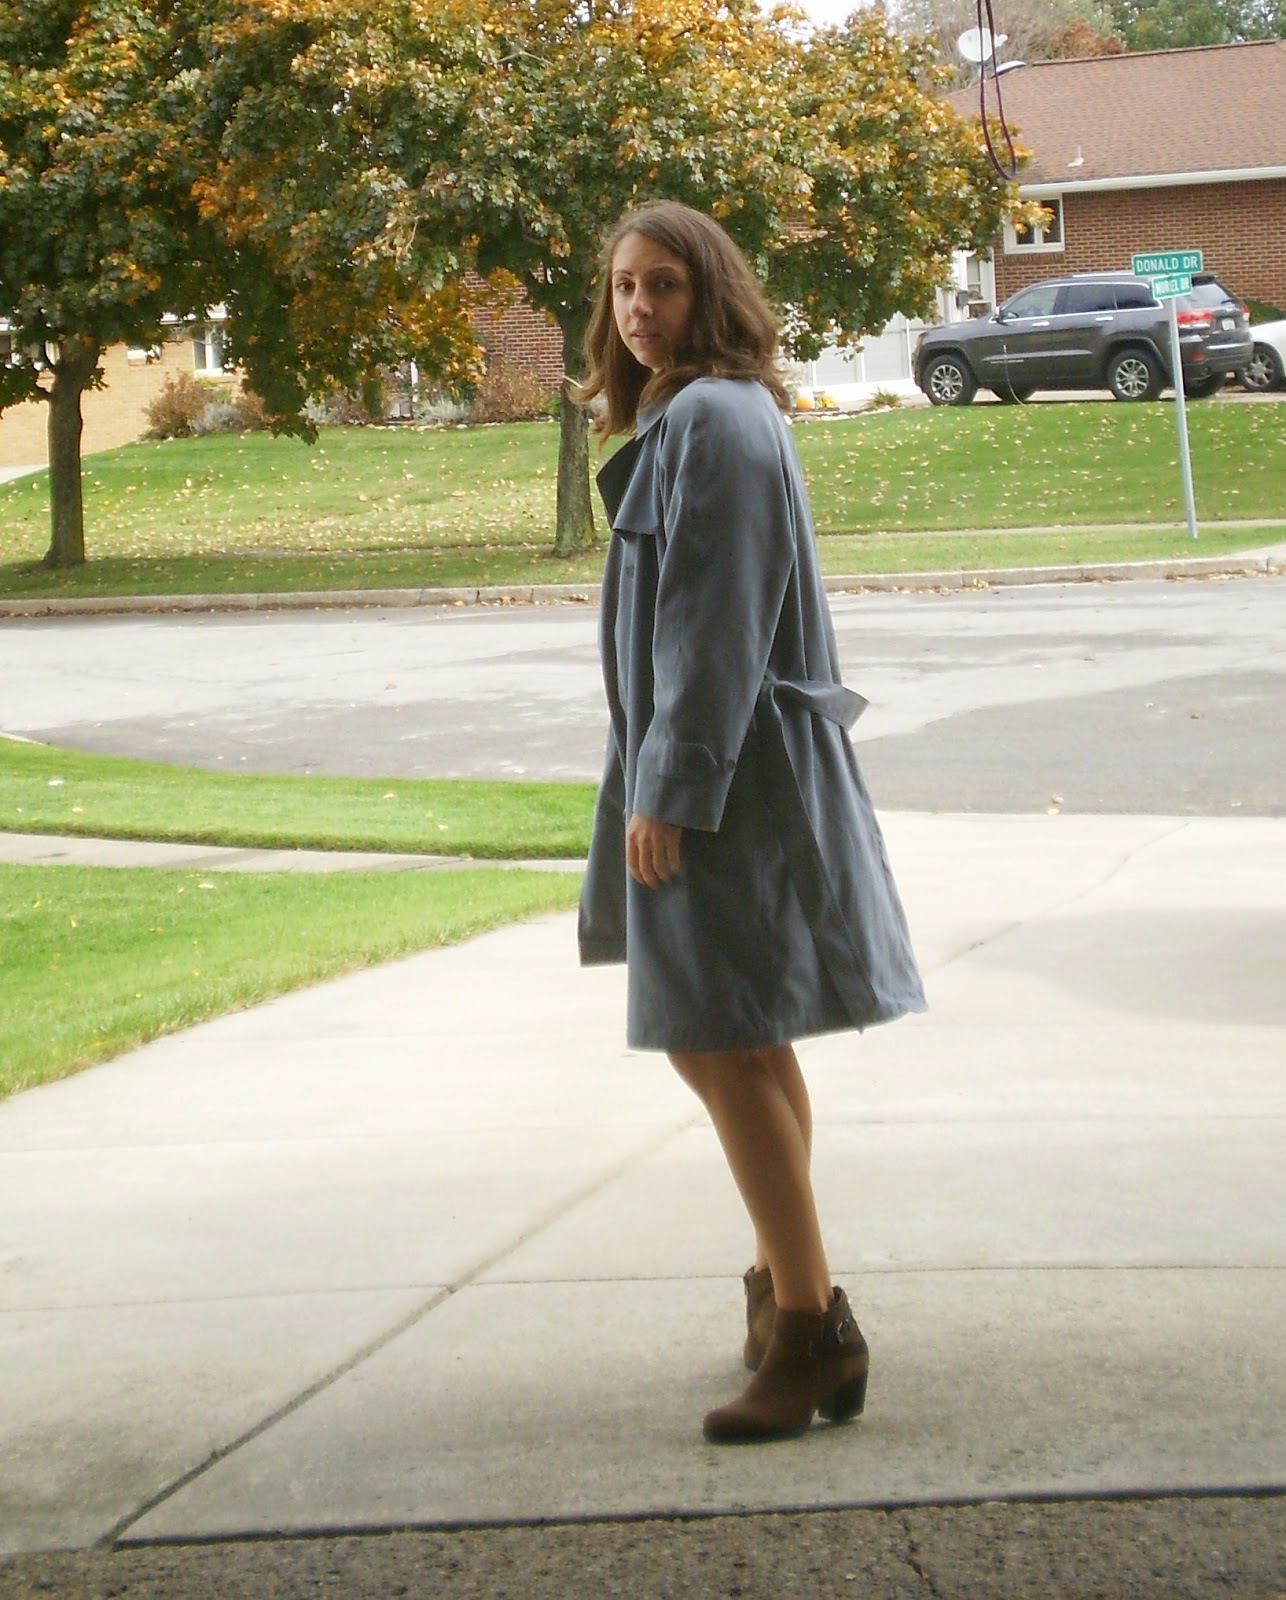
 A few weeks ago, I thrifted this perfect dove gray London Fog trench coat. I used to steal my parents trench coats when I was younger to play dress up. I liked to pretend that I was a detective, okay? Jeez. Now I have my own. I couldn't resist the color of this coat and, for $6, it was a bargain. This is a perfect DIY for Fall fashion.
 This was a very simple alteration. I wanted to shorten the jacket from full length to knee length because it complements my dresses better. I used a ruler and some chalk to draw a line straight across the outside of the jacket to make sure I made an even cut. I ended up only removing about 7 inches of fabric, deciding to make a wide double hemmed band across the bottom (which took the hem line up another 3 inches or so). I folded the cut edge twice and pinned it in place before using a simple straight stitch to create the new band at the bottom.


 I love altering thrifted pieces to better suit my style. It's fun to work from scratch sometimes, but these projects are rewarding because they tend to be pretty quick and simple.

Vintage Velvet Dress ReStyle

I thrifted this dress last week and knew that with some minor tweaks it would be a great addition to my Fall wardrobe. I liked the initial length of the dress, but I'm more comfortable styling shorter dresses for myself so I took about a foot of fabric off the bottom and created a new hem line. Nothing complicated here. I just folded the cut edge up about a 1/2 inch and used a zigzag stitch to prevent fraying.  You can see in the 'after' picture that I didn't do the best job at making the sides even so I need to go back and fix that. Besides the dress length, I removed every other gold button with a seam ripper. Fortunately for me, the buttons were purely decorative (no button holes) so it was an easy fix. There are loop holes in the back of the dress for cinching which create a nice option for adding a ribbon and giving the dress a more fitted look. This was an easy restyle and I'm excited to have a long sleeve dress to play with for Fall!

Monday

Men's Dress Shirt Refashion

 The other day I was fighting a strong urge to go thrifting. I really don't need anything and I know there are things in my closet that I don't wear as it is so adding to it isn't the most responsible thing in the world. So I did the next best thing. I took a piece of clothing I don't wear super frequently and gave it a little DIY love.

I'm that girl who likes to wear over sized menswear pieces. Tie a knot in the bottom, throw on some leggings and boots and I'm good to go. I thrifted this extra large men's dress shirt last year because I liked the colors, but I've only worn it a few times. That makes it the perfect candidate for a restyle project!
This is a simple refashion that has great results. From over sized dress shirt to a more fitted button-down tank, this shirt is now a wardrobe staple.
1. Start with a men's dress shirt.
2. Remove the sleeves and hem the armholes to prevent unraveling.
3. Try on the shirt to determine how much the sides need to be taken in. (I ended up having to take in the seam twice, a total of about 4 inches on each side, but this will differ depending on what shirt you choose and how it fits on you).
4. Sew a new seam on each side, following the shape of the original seam for best results. Trim the excess fabric and then the shirt is ready to wear!


Friday

Dress to Romper DIY

 I could not resist this dress at the thrift store. I knew that I'd never wear it as a dress and I wasn't sure what I was going to do with it, but I couldn't resist the print, the sleeves, or the pockets! Pockets, guys. I was sunk. My mother tried to talk me out of buying it, but I just had a feeling and I'm so glad I did because it is now a rather lovely little romper! I've never turned a skirt into shorts before so it was a bit of a sewing adventure, almost a disaster, with a triumphant finish. I'm a bit too impulsive when I sew, but I won this round!
I started by cutting about 6 inches off the bottom of the dress. Using an existing pair of shorts as a guide, I cut a small triangle out of the center bottom hem to create the leg shape of the shorts. From videos I watched and the tutorials I read I could have just sewn the front and back sides of the triangle together on each side to create shorts, but I knew the leg opening would be uncomfortably tight. So I cut two identical rectangles out of the excess fabric I cut off the bottom of the dress and sewed them, front to back on each side of the triangle and then joined the edges of the two rectangles to create the crotch line of the shorts. This may not make a whole lot of sense until you try to do it, but I promise it's a fairly simple process.
To avoid having to hem anything (hemming is the worst!) and to add a bit of extra length to the romper, I cut two 4inch denim strips out of an old pair of jeans. I folded and pinned the denim around the cuff of each leg opening and stitched the denim in place.
I debated removing the sleeves, but I like the versatility of being able to wear them down or rolled up. This mildly hideous dress is now a cute romper that I can wear buttoned up or layered over a shirt. Success!


Stencil Sweatshirt DIY


 In a few weeks I'm going on a beach vacation with my family. I am dreaming of sunshine, ocean waves, and warm (sand beneath my toes, the beach gives a feeling, an earthy feeling. I believe in the faith that grows And the four right chords can make me cry.) Third Eye Blind just gets it. But I digress. Here is a relatively simple and customizable (my favorite!) DIY. You will need: posterboard (or some other thick paper), a plain sweatshirt, an exacto knife, fabric paint and brush, a ruler and a pencil. I thrifted my sweatshirt to save money and in case I hated how this project turned out, but I don't. This sweatshirt turned out awesome!
1. Figure out what you would like your stencil to say. Pinterest is a good place to look for ideas. I went with the dream life, vacation mentality, but you do you.
2. Decide how much of your sweatshirt surface area you want to paint, and cut a coordinating sized piece of poster board. I had scraps of poster board lying around so I had a few different pieces.
3. Use a pencil and ruler to plan out the spacing of your stencil. I had five lines of text so I made my letters  about 2.5 inches big with a quarter inch of space between each line.
4. Draw out your block letters on the posterboard. I free handed mine so they aren't perfect, but I like the slightly messy look.
5. Use the exacto knife to score the letters. You may need to go over them several times. Make sure you do this on a hard surface. The letters should be easy to pop out when you're done. Depending on how much text you have, this is a bit time consuming so you may want to do it in stages.
6. Place cardboard or folders in between the front and back of your sweatshirt to protect against any leakage.
7. Tape the corners of your stencil down on the sweatshirt then get painting! Just follow the instructions on your fabric paint for how to set it and wash it.

 I really love how this project turned out! I'll admit, I was skeptical as to how well my stencil would hold up, but it did a great job. I'd love to do another stenciled sweatshirt, but maybe of a ship this time, or a cute animal silhouette! If you decide to try this DIY share your photos!


Monday

I Just Came to Say Hello

 Does anyone else find paint therapeutic? I think paint is the ultimate toy. There is something deeply satisfying about smearing color onto various surfaces. Maybe I just like it because it gives me an excuse to play and make a mess...
Anyway, I bought stencils the other day and decided to jazz up one of my plain Old Navy hoodies. It took me a long time to figure out what I wanted the message to be, but I decided that 'Say Hello' could lead to some interesting conversations. You will need a plain article of clothing, stencils, a fabric or paint brush, fabric paint, cardboard, and tape. Here's what I did:
 Place a piece of cardboard inside your garment to keep paint from seeping through the layers. Then determine the placement of your letters and tape them down.
 Paint inside your letters and allow the paint to dry before removing the stencils. Follow washing directions on your fabric paint for best results.

This is another one of those great projects that is completely customizable and super simple to do. It can say anything you can imagine and be in any color you wish. This song seemed fitting for this project. Enjoy!

Sweater to Cardigan DIY

I promise. This will be the last sweater DIY project for a while. Probably. I can't help it! Our weather has been all over the place. What is a girl to do when one week its 95 degrees and sunny and then 60 degrees and rainy the next? It is unbelievable the difference a few months makes. Had it been 60 degrees in, oh say, April or May, I would have been throwin on shorts and a sleeveless top, ready to go! But now that I'm in summer mode and I got used to 80+ temps, 60 feels wicked cold. Either way, this sweater will be your best friend year round. Good for both those cool summer nights when you need something cute to wear at a deck party or during the winter when you're a bundle of unrecognizable layers.
This project is super easy. You can do it in less than 20 minutes. No joke. I thrifted this sweater. I loved the cable knit on the front and I have an affection for over-sized sweaters. As I already have quite a collection of large sweaters I like to wear over leggings, I decided to turn this one into a cardigan. Slightly more versatile and it looks a lot nicer over an outfit than a hoody. I didn't want to disrupt the lovely cable knit so I decided to cut directly up the middle of the back of the sweater. The label had already been conveniently removed, but if you need to remove a label just carefully use a seam ripper. After I cut up the middle, I folded each side over about an inch and pinned it. Then I just sewed up each side with a zigzag stitch. That's it. Super easy and inexpensive project with really great results. If I can find the right fabric, I may even add pockets one day. I know, I know. You're probably praying for cold weather now, right?

Update: I did get around to adding pockets! Leather pockets at that. We fancy. Check it out here!

Saturday

Simple Saturday// Lace Back Sweatshirt DIY

 I realize it is summer and as such it is quite hot and heavy outside. So why all the sweater posts?! Because I actually have time to do the projects now. And besides, nights cool down and a sweater may come in handy. This particular sweater DIY is more summer friendly anyway, as the entire back is replaced with a panel of lace. You can show off one of those cute bandeau bras! I had this sweatshirt lying around, having already removed the back panel for a different project and was wondering what I should do with it. Well, I found an inexpensive lace tablecloth at Amvets and thought it would look perfect with the sweater! Here's what I did:


It's a pretty easy project. Cut out the back, pin in the lace, sew and wear! The most difficult part is some of the maneuvering with the sewing machine simply because sweatshirts are a bit bulky, but this project can easily be completed in less than 2 hours. Happy sewing!